
Review of OwnCloud:
Your site has its own ownCloud server.
Here are the things you need to know about ownCloud and iPads.
Your log on information:

Logging into ownCloud in the building
You access your account on the ownCloud serve by entering your network credentials (i.e., how you would log on to a computer in the lab or library). Most student passwords are configured using their student number as the Name, and whatever password they were assigned, or have changed to themselves. A typical teacher account would be first initial/last name for Name, and again, whatever assigned or changed-to password (this is not, typically, the same as your webmail password).
ownCloud server information:
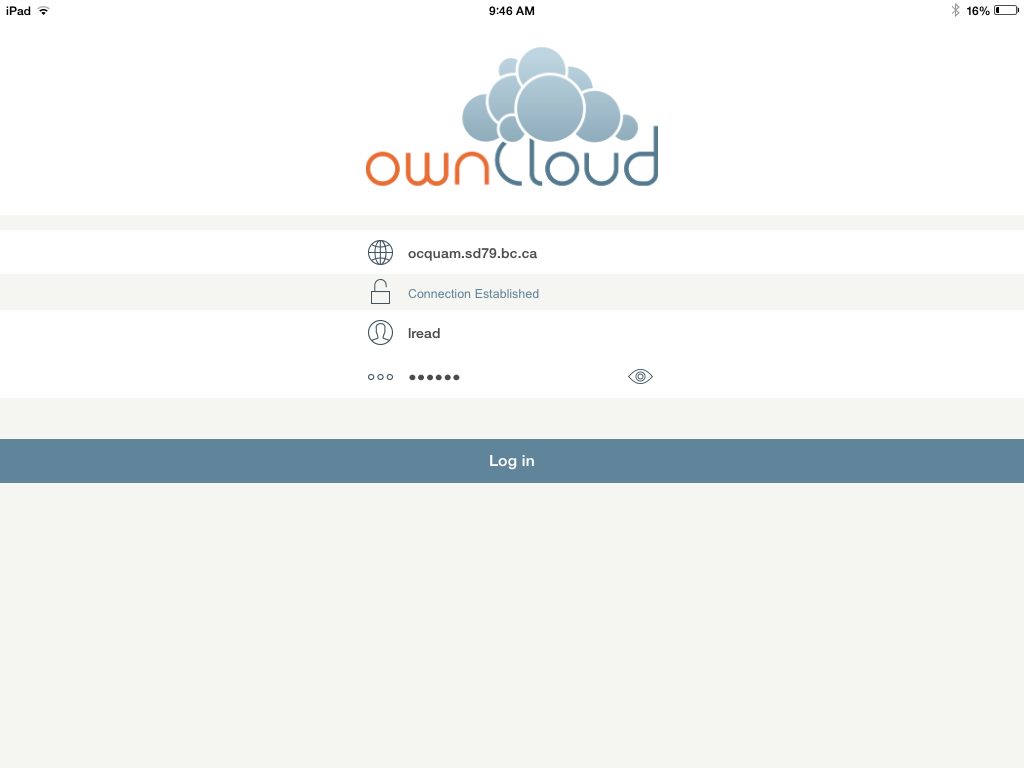
Logging on outside the building
The address to reach your ownCloud server depends on where you are. Let’s suppose your site is the Quamichan Campus. If you are inside the building (i.e., on Quamichan’s wifi network) you simply enter “ocquam” in the server address field. If you are connect to, say, your home wifi and want to access your files, you simply add the rest of the full address: “ocquam.sd79.bc.ca”. The reason for these two addresses is if you are inside the building, you need not go out (via the Internet) and back in again, you can move files around on the network more efficiently. However, as mentioned, by enabling the full path in the address field, you can now access your stuff anywhere, anytime you can connect.
Managing ownCloud with students:
Once your students have mastered logging on and are ready to upload work, there are 2 things to always keep in mind. Anything stored on the device is/will be available to anyone who uses the device. Make sure you communicate to your students that they need to remove photos, documents or movies from their device when asked. Likewise, they must remove their ownCloud information at the end of EVERY session.
A sample class might look like this:
- Distribute iPads
- Students log into ownCloud
- Work is created on device
- Work is uploaded to ownCloud
- Student confirms work is saved to ownCloud
- Student deletes project from iPad
- Student deletes account from ownCloud
- iPads are ready for next students
The use of ownCloud in this manner also alleviates the need to assign the same device to the same student every session. Certainly some teachers prefer to keep work on the device, especially if it is an ongoing project. Whatever you decide and prefer at your site is your choice, the goal here is to make sure you know of all the options.

This is what you should see once you successfully log in.
To save to ownCloud in iPads: Except for photos or videos, all saving to ownCloud happens in the App. SO, if you are in Book Creator, for example, and are ready to save, ensure you are logged into owncloud, then open the project in Book Creator. Select the share icon (it looks like a piece of paper with and arrow pointing up), then select either “open in ownCloud” or “open in another app”, and then select ownCloud. Ensure that the file extension (.epub, .key, .pages) remains if you change the name of the file– this is very important, and if left off, ownCloud will not know how to open it.
To log out of the device, touch the Settings icon (looks like a gear or cog). This will reveal which accounts are logged in. Touch the account you wish to log-out (represented by Student number) tap or slide the account name to reveal the red “delete”. Touch delete. You may get a pop-up window offering a choice, choose “Remove account from server” or “delete account”. Assure learners they will not have their files deleted, it’s just another way of saying “Log out” 🙂
Trouble Shooting.
-the file side won’t scroll all the way down and you can’t access the Manage Accounts tab or the topmost file. Double click your home button to reveal open apps, navigate to the ownCloud window, swipe up to close it, then reopen the app.
-files don’t appear in the left column after upload. Swipe down to refresh the column, or close/reopen as above.